
Progress on the shooting frame
Technical, Guns ·Friday July 31, 2009 @ 19:17 EDT (link)
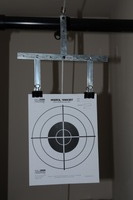
Target holder
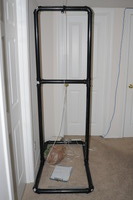
One frame
One of the reasons that it's nicer shooting at an indoor range is that there's no need for a cease-fire to change targets: the lanes have targets on rails, with electronics to bring the targets in and send them out. Outdoors, it's necessary to solicit and get a consensus among all shooters present for a cease-fire, and it seems like an imposition on those that are shooting slower, or have more targets and thus don't need to change them so often.
A little while ago I had an idea to build a portable "shooting frame": a frame I can bring to outdoor ranges such as the Sultan pit or SVRC and set up so that I can change targets without a cease-fire. (In case there are readers that aren't shooters: don't even think about crossing the firing line when the range is "hot"—when other people are shooting. Even if they're not shooting near your targets, ricochets and accidents happen, and it's not worth risking your life over. Everyone else would stop shooting anyway.)
Taking a cue from a target-holder made of ABS pipe, I built two frames (7' tall and 20" wide, with a crossbar in the middle and "feet" for stability) of black 1½" ABS pipe (about 50' in all, costing about $30, plus six elbows and four tees for each, about another $30). ABS pipe fits together much better than expected. I was going to drive to Home Depot to get it, but I stopped in at our local True Value, and not only did they have it but they cut it for me (no charge); compare Home Depot, who only offered to sell me a hacksaw. I strung a line (3/8" nylon pulley rope) across the tops of the frames, and tied a few more guy lines from the middle rung to the base, and added some weight on the back (books here, rocks or sand inside the back pipe outdoors) to help stabilize the structure and keep the rope taut. Slip knots are tied in the guy and top ropes for easy tightening.
A pulley is attached to the rope at the top, then via a #10-32 bolt a thin piece of sheet metal (about ¾" wide and 5" high) going down, then a crosspiece about 11" wide (for these metal pieces I'm using "strap ties" from Home Depot, $1.15 each, I need two, plus spares in case any get shot; they have screw holes about every 1½"; earlier I was using a carpet bar, but that cost more than twice as much, and had no holes, so I returned it… I returned quite a few things during this project, as I came up with better ideas and the project evolved). From the crosspiece hang (bolted) two more straight pieces (could also be strap ties, but I'm using a couple of PCI slot covers that I had lying around. They work well because of the right angle bend at the bottom: I glued the tops of two binder clips to the hanging slot covers, and to that the target paper is attached.
Thread or twine is looped around the top pipes of each frame and used to move the target, on its pulley, back and forth. Originally I'd planned to move the overhead rope itself (and fix the target to the rope) but this way is much less disruptive (disturbing the frame too much slackens the rope, which causes the target frame to sag).
As you can see from the photos above, ropes go down the middle where the shooter would stand (and behind the target at the far frame), but that will be changed to tie the overhead rope only to the top of both frames and then use guy ropes at each side to not block the shooter. Besides that, I'm considering replacing some of the target frame metal with wood (perhaps balsa or whatever I can get from a model shop), to lighten it and reduce sag, although that's not really a problem now, but it might be worse when I change the guy ropes around, or in the "field". I also need to get some twine (instead of thread) to use to move the target frame, since thread is very difficult to see.
Books finished: The Shadow Rising, New Deal or Raw Deal?.DVDs finished: Friends: The Complete Seventh Season, Monty Python and the Holy Grail.


